Python requests – HTTP library. Examples

If you need to send some HTTP requests and that requires additional processing on your side maybe it’d be better to draft some script. If you happen to know python then you can try its Requests library. Some simple snippets that can be used are placed further.

Set up a session

import requests
from requests import Request, Session
from requests.auth import HTTPBasicAuth

s = requests.Session()

Send POST request:

registrationData = {'registrationCode' :registrationCode ,'customerReference': customerRefNo}
 registrationResp=s.post(host + '/customer-account/register',headers = headers, data = registrationData)

Just add required headers e.g

headers = {
 'User-Agent': 'Mozilla/5.0 (X11; Linux x86_64) AppleWebKit/537.36 (KHTML, like Gecko) Chrome/29.0.1547.62 Safari/537.36'
}

Send POST with json data

authorisationPayload = {"personRoles":[{"role":"Owner","personId":userId}],
 "personPrivileges":[{"privilegeNames":
 ["Full permissions","Amend ","No access - cs","No access - cs agree"],
 "personId":userId}]}
ra=s.post(host + '/organisation/' +str(businessID),headers = headers, json = authorisationPayload)

Dealing with Cross-site request forgery

If we have XSRF token added to requests we need to extract it.

def getXsrf(cookies):
    for cookie in s.cookies:
       if cookie.name =='XSRF-TOKEN':
          return cookie.value

and add it to our headers

xsrf = getXsrf(s.cookies)
 headers['X-XSRF-TOKEN'] = xsrf

Extract data from Json response:

 if ( ra.status_code == 200 ):
   organisationID = ra.json()['_data'][0]['id'] 

In case of unverified HTTPS requests we can suppress warnings (if we really want it) :

from requests.packages.urllib3.exceptions import InsecureRequestWarning
requests.packages.urllib3.disable_warnings(InsecureRequestWarning)

We also probably need to add to our request this parameter  verify=False
to skip verification of HTTPS certificate. Use it if needed of course.

Python requests – HTTP library. Examples

Jmeter – If controller example

If controller  example to control which request to send based on response of the other sampler.

We’re using Dummy Sampler to generate requests.

We also need to extract response’s code. We can use Regular Expression Extractor to get it:

  • Field to check: Response Code
  • Reference Name: RESPONSE_CODE
  • Regular Expression: (\d+)
  • Template $1$

First If Controller Condition

  • ${RESPONSE_CODE}!="200"

Second If Controller Condition

  •  ${RESPONSE_CODE}=="200"

Setup Dummy Sampler to return code 200.

Dummy Sampler - 200

Result:

if controller - yes condition

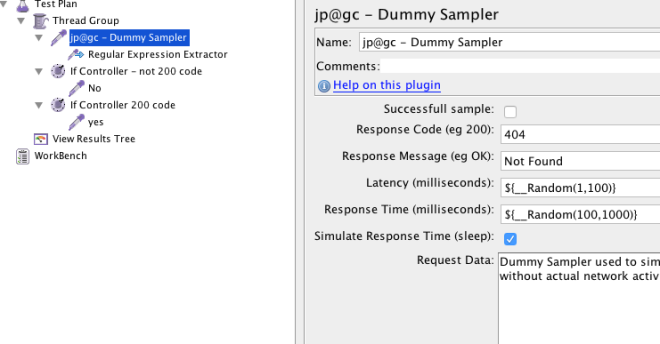
And now edit it to return something other than 200

Dummy Sampler - 404

Result:

If Controller result


Jmeter – If controller example

Jmeter’s Variables From CSV File – relative path

Jmeters Variables From CSV File config element set its base directory as a user’s home directory. If you ‘Browse’ your file it will put something like:

/Users/your_user/./your_file.txt

So in such case we need to pass base directory to be able to work with relative paths for our files.

1. Define base directory in User Defined Variables:

baseDir =>  ${__BeanShell(import org.apache.jmeter.services.FileServer; FileServer.getFileServer().getBaseDir())}

2. Use it in your element:

${baseDir}/../data/your_data.csv
Jmeter’s Variables From CSV File – relative path

Use Jmeter’s base directory

You can access these variables using Beanshell as follows:

  1. JMeter’s base dir
    import org.apache.jmeter.services.FileServer;
    
    String baseDir = FileServer.getFileServer().getBaseDir();
    vars.put("baseDir", baseDir);
    
  2. JMeter’s script location (GUI mode)
    import org.apache.jmeter.gui.GuiPackage;
    
    String testPlanFile = GuiPackage.getInstance().getTestPlanFile();
    vars.put("testPlanFile", testPlanFile);
    
  3. JMeter’s script name (non-GUI mode)
    import org.apache.jmeter.services.FileServer;
    
    String scriptName = FileServer.getFileServer().getScriptName();
    vars.put("scriptName", scriptName); 
    

If you prefer you can get the same using __Beanshell() function as

${__BeanShell(import org.apache.jmeter.services.FileServer; FileServer.getFileServer().getBaseDir())}

and it will return current base directory where it is called.

source: http://stackoverflow.com/a/28110434/1037754

Use Jmeter’s base directory

Ubuntu Linux Start / Restart / Stop Apache Web Server

/etc/init.d/apache2 is service script used to start / stop / restart the Apache2 service under Debian or Ubuntu Linux. You need to login as root or use sudo command restart Apache.

Task: Start Apache 2 Server

# /etc/init.d/apache2 start
or
$ sudo /etc/init.d/apache2 start

Task: Restart Apache 2 Server

# /etc/init.d/apache2 restart
or
$ sudo /etc/init.d/apache2 restart

Task: Stop Apache 2 Server

# /etc/init.d/apache2 stop
or
$ sudo /etc/init.d/apache2 stop

The usual location for Debian-like systems (ubuntu) is to place webfiles under the /var/www/… branch of dirs. That is also the location where apache would look (at least you find it in many example apache config files).
So you could build dirs like that:

/var/www/example.com
/var/www/sub1.example.com
/var/www/sub2.example.com
etc.

You may see such statement:

„Could not reliably determine the server’s fully qualified domain name, using 127.0.1.1 for ServerName”

To fix that problem, you need to edit the httpd.conf file. Open the terminal and type,

sudo gedit /etc/apache2/httpd.conf

By default httpd.conf file will be blank. Now, simply add the following line to the file.

ServerName localhost

Save the file and exit from gEdit. Finally restart the server.

sudo /etc/init.d/apache2 restart
Ubuntu Linux Start / Restart / Stop Apache Web Server